How to Use Eccentric Screws for Wheel Alignment
Eccentric screws (Eccentric Camber Bolts / Alignment Bolts) are crucial components in wheel alignment, primarily used for fine-tuning camber angle or toe angle. Below is a detailed guide on their usage, adjustment steps, and precautions.
1. Purpose of Eccentric Screws
-
Adjust Camber Angle: By rotating the eccentric screw, the suspension mounting point shifts, altering the tire’s tilt.
-
Some Models Allow Toe Adjustment: Certain designs permit minor toe adjustments for front or rear wheels.
-
Replaces Factory Bolts: OEM bolts may lack adjustability; switching to eccentric screws expands alignment flexibility.
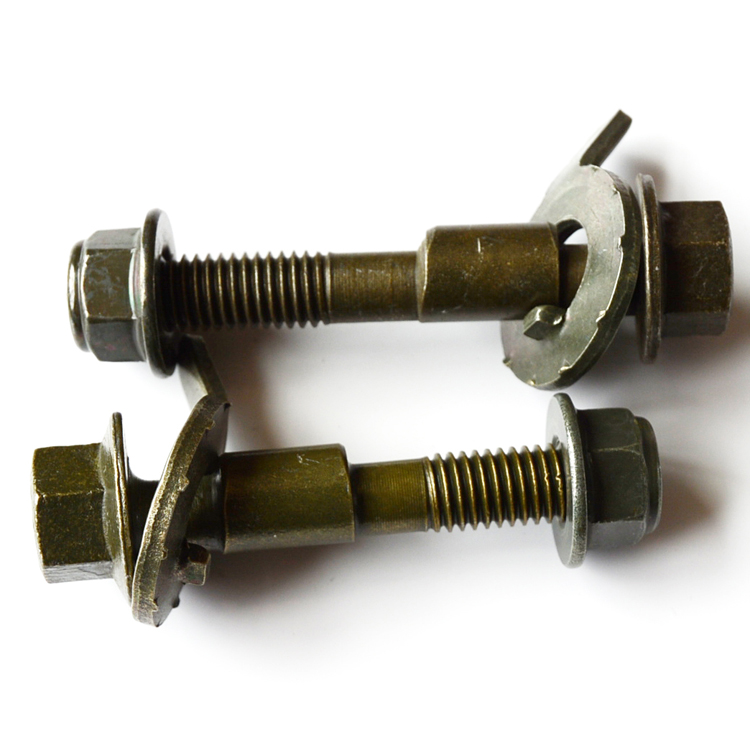
2. Structure of Eccentric Screws
-
Eccentric Washer (Cam): The screw head or washer has an offset design, moving suspension components when rotated.
-
Calibration Marks: High-end screws may include angle indicators for precision adjustments.
-
High-Strength Material: Typically made of chromoly steel or heat-treated alloy for durability.
3. Installation & Adjustment Steps
🔧 Step 1: Preparation
-
Park the vehicle on a wheel alignment machine and secure the steering wheel.
-
Lift the car and remove the wheel requiring adjustment (e.g., front wheel for camber adjustment).
-
Locate the upper or lower control arm mounting bolt (common on MacPherson struts or double-wishbone suspensions).
🔧 Step 2: Remove OEM Bolt
-
Use a torque wrench to remove the factory bolt (support the suspension to prevent sudden drops).
-
Clean the bolt hole to ensure no rust or debris remains.
🔧 Step 3: Install Eccentric Screw
-
Insert the eccentric screw into the original hole without tightening yet.
-
Observe the washer’s initial position (usually "neutral" for minimal offset).
🔧 Step 4: Adjust Alignment
-
Connect the alignment machine to read current camber/toe data.
-
Rotate the eccentric screw:
-
Turning clockwise/counterclockwise moves the suspension mounting point.
-
Each 90° rotation changes camber by ~0.25°–0.5° (refer to vehicle specs).
-
-
Monitor alignment data until reaching recommended values (e.g., camber: -0.5° to +0.5°).
🔧 Step 5: Tighten the Screw
-
Once adjusted, torque the screw to OEM specs (typically 80–120 Nm).
-
Recheck alignment to confirm no shift occurred.
🔧 Step 6: Road Test
-
Reinstall the wheel and conduct a short test drive to check for noises or pulling.
4. Key Precautions
⚠️ Safety First:
-
Support the suspension properly when removing bolts to avoid sudden drops.
-
Always use a torque wrench to prevent loosening or breakage.
⚠️ Limited Adjustment Range:
-
Eccentric screws allow minor corrections (±1° max). For larger deviations, use adjustable control arms or aftermarket kits.
⚠️ Compatibility Check:
-
Not all vehicles support eccentric screws—verify thread specs (e.g., M12×1.25, M14×1.5).
⚠️ Post-Alignment Inspection:
-
Recheck torque and alignment after 500–1,000 km of driving.
5. FAQs
❓ Q: Can eccentric screws adjust caster angle?
→ Generally no—caster requires subframe adjustments or shims.
❓ Q: Are eccentric screws suitable for modified cars?
→ Yes, but lowered vehicles may need extended screws or adjustable arms for greater range.
❓ Q: Do eccentric screws weaken the suspension?
→ High-quality screws (e.g., SPC, Whiteline) meet strength standards, but cheap ones may fail.
✅ Summary
-
Eccentric screws enable camber/toe micro-adjustments—confirm compatibility first.
-
Always use an alignment machine for precision.
-
Proper torque is critical to avoid safety risks.
-
For extreme adjustments, consider adjustable control arms or aftermarket solutions.
Used correctly, eccentric screws optimize tire contact, enhancing handling and tire life! 🚗💨
